
- A piece of plain, preferably medium-weight cotton or linen (i.e. woven) material. A tea towel or serviette would be perfect.
- contrasting thread (your regular sewing thread)
-An air-soluble fabric pen to draw your design on
 That's right, 'free motion' does not mean '100% improvised'. A simple and minimal design will work best. You will be drawing only an outline onto your fabric - not too much detail. The sketchy, improvised look will come, not from your design, but from the way choose to stitch it.
Stuck for a design? You don't have to be a drawing genius. Use a stencil! Copy something out of your kids' colouring book! Trace around your hand. You are welcome to use my Bird on a Branch design idea. Draw your own bird, use a free applique design (like these ones) or trace/print the one below if you like:

Techniques
1. Transfer your design onto your fabric

Using an air-soluble marker, draw your design on. As you can see I've kept it fairly simple. The outer shape of the bird I used here was based on one in a kids' stencil book I was given. See, not looking so clever now, am I? :-)
2. Straight-stitch over your outline
Now you want to 'draw' over the outline with thread, just once, to make it clear on the fabric:

To do this, set your machine on a plain straight stitch, set to its shortest length (this will make it look like one long line). Start sewing, guiding the outline under your presser foot.
When negotiating turns and curves, just go slowly. To make sharp corners (like the beak, above)stop, lift your presser foot, pivot the fabric and lower the foot before continuing to sew along your outline.
TIP: Stop and start as much as you like, but try to do the whole thing with just one thread (i.e. don't pull the fabric out and cut the thread). The fewer loose threads you have, the better.This will probably mean going over some parts of your design more than once to get to other parts, which is fine.
3. Straight-stitch over your outline again. And maybe again!
Now we want to start adding some character and complexity. I think the most simple way to do this is just to sew over your outline again in straight stitch:
Pick up from where you've left off, preferably without removing the fabric or cutting the thread. This time, don't be so careful. Try to follow your design line approximately, but not precisely. (You can lengthen the stitch here if you like, but remember that the smaller the stitch length, the more ink-like your line will look).
Can you see what is happening? Just by tracing around the same thing a few times, you will start to build up texture and movement in your design. It will start to look a little sketchy, a little messy. Go out of the lines a bit, just for fun. Wasn't that naughty? Wheeeee...
Now, if you like, you could do your whole design simply in straight stitch like this. That would look just lovely. If that's what you'd like, read no further... go and get on with it!
4. Add some grunge!
For those who like to live really dangerously, well now it's your moment to shine. It's time to add some splotches and 'ink blobs', a bit of shading and thickness. To do this you will want to go over part or all of your design again, adding a bit of detail largely by varying the stitch length and stitch width:
 This is what my stitch width dial looks like... you should have something similar on your machine (although I can't talk for computerised machines, sorry!)
 This is my stitch length dial. For the straight sketching I kept it all between 1-2. For this part, I like to set it on 'satin stitch', which is the 'F' setting.
Choose a simple part of your design to start on (e.g. the branch). Decide on your stitch length. Start sewing, and as you go, wiggle the stitch width around a bit. I like to do this in short bursts, sometimes just going wide for a bit, sometimes cranking it up to maximum. There is no formula here, you have to be brave, have a go and see what it looks like. Here's a snippet of my branch:
 Just to be clear, here's what I did:
- The top line is a wobbly zig-zag stitch. I have set my stitch length to maybe a medium. Then, as I'm sewing, I have turned the width dial up and back again.
- The second line looks like a regular straight stitch, but it's actually a satin stitch, which is just that bit denser. I didn't vary the width on that one.
- The fourth line is a satin stitch again, this time with the width varied, which produces a nice, thick, inky look. My favourite technique is to go over the design in satin stitch, just every now and then playing with the width dial.
And here's a shot of my bird: As you can see I was fairly minimal on this bird. I did a widening satin stitch for the legs, and a wee bit of zig-zagging on the outline just for variation. I didn't think about where I was doing things, I just wanted to break up the line a bit.
Here's another bird I tried, with different effects:

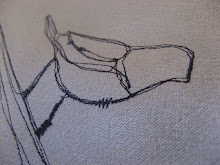
This time I 'scribbled' inside the bird. You can do this by using a straight stitch and sewing back and forth in an area, holding and then releasing your reverse/back-tacking switch to change directions. You'll probably need to pull the fabric across gently as you sew so that the lines don't all end up on top of each other.
 (I don't think this effect suits the design as well, but you need to experiment with techniques to see what you like!)
5. Finish, clip threads, iron, pat self on back.
That's it folks.
Please let me know if this is helpful, and if you do some experimentation. I'm very happy for you to use my design, but please link me in if you're blogging, and if you become rich and famous making 'bird on branch' thread sketches be sure to remember me in your will!
Happy sketching.


I love this! It looks incredible :)
ReplyDeleteLove it! Thanks for sharing! x
ReplyDeleteTerrific Gina...you've done a great job.
ReplyDeleteSuch a great tutorial Gina. Very clear and easy to understand. = )
ReplyDeleteThanks for demystifying the process. I would have thought that I would have to use a free motion foot. I love the way you've changed the stitch selection mid sewing...ingenious!
ReplyDeleteVery helpful. Very easy to understand. Fabulous tutorial.... but I still think you're a free-wheeling goddess :) K
ReplyDeleteA fantastic tutorial! Thanks Gina for spreadign the thread sketching goodness x
ReplyDeleteso great! thanks. and as for what i am making today - well, pillowcases are cotton, medium wieght and the perfect fabric to have a bit of a go with thread sketching. (once i finish cleaning the kitchen...)
ReplyDeleteA big thankyou to you. I wasn't able to comment here before so have mentioned you on my blog. Thanks. My project should be finished tomorrow if I ignore the housework. LOL Cherrie
ReplyDeleteAs all those work commitments have been nearing an end I have been eying off the as yet unopened package containing a free motion foot I bought ages ago. Gotta love a bit of thread sketchery...(and great tut Mrs).
ReplyDeleteGreat post Gina! I am making my mum a bag for her birthday and I might just give this a try!
ReplyDeleteI love the new header by the way. Gotta love a to do list!
Very cool. I'm putting it on my list ;-)
ReplyDeleteGreat tutorial! Your method looks like so much fun. So you kept the presser foot down for all the steps?
ReplyDeleteI love it all! Especially the bit where you go 'wheeeee'. Thanks for taking the time to share your experience, I will definately be having a go, and I'm thinking I'll follow your branch and birdie first up.
ReplyDeleteWhen I'm done I promise to show you....no matter how bad (or good?) it is.
Cute! I would have never thought of doing it this way. It looks great.
ReplyDeleteLove your new 'look' by the way!
I love, love, LOVE this so much!! Birdies are just my favourite and all those sketchy bits look fantastic! Thanks for taking us through the steps - got to go try this now!
ReplyDeletefantastic!:)
ReplyDeleteI'm inspired - I'm going to give it a go.
ReplyDeleteThanks for being a wonderful teacher.
I am totally going to give this a go. Thank you for generously sharing all your secrets.
ReplyDeleteI really love your thread sketching, Gina. Hope we see more!
oh - looks so cool and the whole no plan thing is just up my alley! Well done you on doing it and insiring.
ReplyDeleteThis would have taken a lot of brain power and time to put together Gina. Both things that are precious commodities.. so thankyou... very much.
ReplyDeleteAwesome and very clear tutorial. I have this one saved for that opportunity when it arises... just have to come up with an idea now. Thanks so much for posting this tute!!!
ReplyDeleteWhat a fantastic tutorial, thanks Gina!
ReplyDeleteYou are bad ass. I am still not attempting this though. But thanks to you, I think that one day I just might be able to pull it off.
ReplyDeleteThank you so much for this Gina, I can't wait to give it a go!
ReplyDeletethanks for putting this up, it's great ~ hope one day to get some bravery happening and give it a go!
ReplyDeleteclever clever :)
ReplyDeleteThis is fantastic and gives me courage to try it! Many thanks!!
ReplyDeleteThank you for posting this tutorial. I've wanted to know how to do this, and now I feel like I can try it with some success.
ReplyDeleteThanks for the wonderful tutorial!
ReplyDeleteGood job Gina. I have been trying to explain this to people for a year or so now. I have a pattern out of birds and they are patchwork birds that are sketch stitched over top and some people just don't get it. Or they are afraid. Or they don't like it. Well I do!
ReplyDeletethanks
OMG this is fabulous! I've always seen people using special feet for their machines and I'm really pleased you've shown me that I don't need them!
ReplyDeleteI love this - keep experimenting, you've got real style here. I've been using the 'scribble' or sketch technique myself but over little heart and flower appliques which I enjoy. I adore the birds but not been brave enough with my drawing skills to have a go yet. And the use of the zig zag or satin stitch is genius.. thanks for the idea - I've got to give that a go. Keep blogging x
ReplyDeleteExcellent tute :-) I've used a darning foot with the feed dogs up or down for freemotion drawing and quilting in the past and it works well for moving freely around an intricate design.
ReplyDeleteI am pulling myself off my computer right now to give this a go. We'll see... Thanks so much!
ReplyDeleteThank you for such an inspirational tutorial. I've been wanting to try this for some time now and I think this was just the right push.
ReplyDeleteDear clutterpunk. You are my hero. Thank you! Check out my blog - I just posted a pic of one I did tonight...because that seemed like more fun than going to bed. You do a birdie...I do a crying naked girl. Tomato, tomahto.
ReplyDeleteI have just given this a go - what a great tutorial. Mine didn't turn out quite as well as yours, but I will try it again - it was great fun! Thanks.
ReplyDeleteYour voice on this is brilliant. You are clever, you are!!
ReplyDeleteGreat Tutorial... thanks must give it a try... you make it look easy!
ReplyDeleteThanks for a wonderful tutorial! I will give this a try for sure! -me@salihan.com
ReplyDeleteThat's awesome, such a well explained tutorial.
ReplyDeleteI think this is awesome! I can't wait to try it out.
ReplyDeleteGreat tutorial! I've done this over a pre-printed design, but have never tried it solo... this looks great!
ReplyDeleteI linked to your piece on my blog at www.livingonpinsandneedles.blogspot.com and posted your bird picture. People need to see this one!
I love this!! Thanks for the tutorial!
ReplyDeletetotally inspirational! Thanks soooooooooo
ReplyDeletewow, thanks so much! This makes me want to go home and try it, right away.
ReplyDeleteGreat tutorial (and so funny too, many chuckles as I read through...) I will add this to my to-do list. I'm on a bit of an embellishment rampage at the moment, so will look forward to giving this a go. You are an inspiration! (and so clever!)
ReplyDeleteThank you for this tutorial, it's fantastic and very clear!! I hope you don't mind I have put a link to it from my blog (http://gwiblog.blogspot.com/)
ReplyDeleteElaine
see. Now I get it. Now it looks easy. Now I am excited anough to have a go at it! thanks x
ReplyDeleteLove Love Love this so much, must have been under a rock that I have missed it until now...I have tried something similar in the past without the grunge and thought I was secretly breaking some 'free-motion quilting foot rule' you've just made me feel so much better:) Tam xo
ReplyDeleteI love little birds....I am a chickie
ReplyDeleteIt never ceases to amaze me... there are so many new things to do, ways to play. And this? Wow, I really want to try this. Thank you for sharing your sketchy-stitch drawings and thank you for making it so accessible.
ReplyDeletethis is great! i've tried stuff like this before, but can never seem to get my sketches to look like anything. thank you so much for this post. :)
ReplyDeleteSo excited to hear you don't need a special foot or "lowered feed dog", which my machine won't do. I plan to try this out today if baby cooperates! Thanks for sharing your ideas and creative inspiration with us blog reading sew-aholics. :-)
ReplyDeleteA wonderful light hearted tutorial. Just fantastic! Thanks very much for this. I will definately have a go. x
ReplyDeleteWOW! That sounds soooo much easier than it looks! I can't wait to try it!!!
ReplyDeletethis is awesome!!! Thanks for showing how to do it!!
ReplyDeleteYeah!!!!! Been 'thread sketching' all night -- thanks!!!!!!
ReplyDeleteThis is awesome ! Thanks a lot!
ReplyDeleteI'm so excited to try this!!!
ReplyDeleteHey, this is so cool. I really like your stuff... I find it really inspiring and I base some of my crafts off of yours... I'm sure that you don't have time. But I would love for you to check out my blog... http://sewnandheard.blogspot.com/ I'm a new blogger and I feel a little left out of the crafty blog scene. Keep making awesome stuff.
ReplyDeleteGreat Post! Check out my blog http://sewnandheard.blogspot.com/
ReplyDeleteLove this! Thanks for sharing! Can't wait to try it out for myself. . .
ReplyDeleteOH goodness! I just discovered this technique on Sunday! I've made an attempt myself and am SO grateful for all of your hints and tips. I was also surprised at how it looks totally mysterious and difficult, but it is incredibly rewarding and fun.
ReplyDeleteWhat an awesome tutorial. I had been checking out the art of thread sketching. You made this look soooo simple, thanks. I can't wait to tackle something myself.
ReplyDelete....oh I am glad you like my Red shoes!!
ReplyDeleteTHANK YOU for this sensational tutorial - I have already had a go and have pictures on my Sew Frayed blog. This is just too much fun!!!
Michelle
This is really cool. I would love to try this someday. I am featuring this at somedaycrafts.blogspot.com. Grab my "featured" button
ReplyDeleteLoved this tutorial so much I featured it on my blog. I can't wait to try this out. Thanks
ReplyDeleteThat is just a very cool idea- thank you!!
ReplyDeleteI used this tutorial the other day - love it!
ReplyDeletei am so delighted to find this tutorial, thank you! will be following your blog from now on and can't wait to try this!! maisy x
ReplyDeletehad to trackback to find this post - thanks for the information. i'd been intimidated by the idea before, now i'm definately going to try it. cheers!
ReplyDeleteoh! i tried it! and i'm really pleased with my little bird on a branch. your tutorial is clear and definatly de-mystifying. THANK YOU!!
ReplyDeletehere's a link to my flickr where you can see the results:
http://www.flickr.com/photos/23rdspiral/4992790630/in/photostream/
http://www.flickr.com/photos/23rdspiral/4992184139/in/photostream/
thanks so much. just started free motion embroidery and was disappointed today that my new darning foot failed to show up in the post. then i found your tutorial! wonderful my day is back on track and going to try this out now. lovely!
ReplyDelete& Greetings from Chester!
Thanks for sharing..........
ReplyDeleteNice creativity.
Nice post...I like it
ReplyDeleteHello ,I am featuring this at some day crafts ,Thanks for sharing .
ReplyDeleteUnbelievable technique this was It's my first experience to see this height of working. nice blog.
ReplyDeleteSmead labels
Great tutorial! Your method looks easy to follow. Thanks so much!
ReplyDeleteThanks for taking the time to share your experience, I will definitely try one and I'm thinking I'll follow your branch and birdie first up. Great tutorial!
ReplyDelete